Learn how to use drill taps for fast and precise threading with tips, charts, and vast’s durable drill tap sets for DIY and pro projects.
Tired of juggling multiple tools just to drill a hole and cut threads? A drill tap is your shortcut to faster, cleaner threading—combining drilling and tapping in one smooth step. Whether you’re a DIY enthusiast mounting hardware or a pro tackling tricky electrical panels, mastering how to use a drill tap tool can save you serious time and frustration. In this guide, you’ll discover everything you need to know to get flawless threads without the usual headaches—plus, tips to avoid breakage and boost efficiency with vast’s trusted drill tap sets. Let’s dive in and unlock your project’s full potential!
What Is a Drill Tap Understanding the Tool and Its Core Functions
Ever wonder what exactly a drill tap is and why it’s a go-to tool in your workshop? A drill tap is a combination tool that handles two jobs in one: drilling the right-sized pilot hole and cutting threads inside that hole. This saves you time and ensures perfect alignment when tapping threads.
Anatomy of a Drill Tap
- Drill tip: Starts the process by drilling the precise pilot hole diameter needed for tapping.
- Tap section: Follows the drill tip, cutting internal threads that match the bolt or screw you plan to use.
- cURL Too many subrequests.: Most drill taps are made from high-speed steel (HSS) or durable cURL Too many subrequests., offering strength and wear resistance for various metals.
How It Differs from Standard Drill Bits and Taps
Normally, drilling and tapping are a two-step process. You drill a hole, then switch tools to tap it. A drill tap combines both steps into one, letting you drill and thread in a single go. This is a one-step process that speeds up work while keeping things precise.
Common Types of Drill Taps
- Hex shank drill taps: Designed for cordless drills, these fit easily into quick-change chucks.
- Machine-grade taps: Built for use on mills or lathes, offering higher precision.
- Metric vs imperial sizes: Available in both measurement standards to fit whatever project or fastener system you’re working with.
When to Use a Drill Tap
Drill taps shine when working with thin metals, typically less than 10 gauge steel or aluminum. They’re ideal for quick jobs on sheet metal, brackets, or light gauge parts, but not great for heavy-duty CNC use or thick stock over a quarter inch. In those tougher cases, stick to separate drill and tap steps for more control.
Essential Drill Tap Sizes and Charts Choosing the Right Fit for Your Project
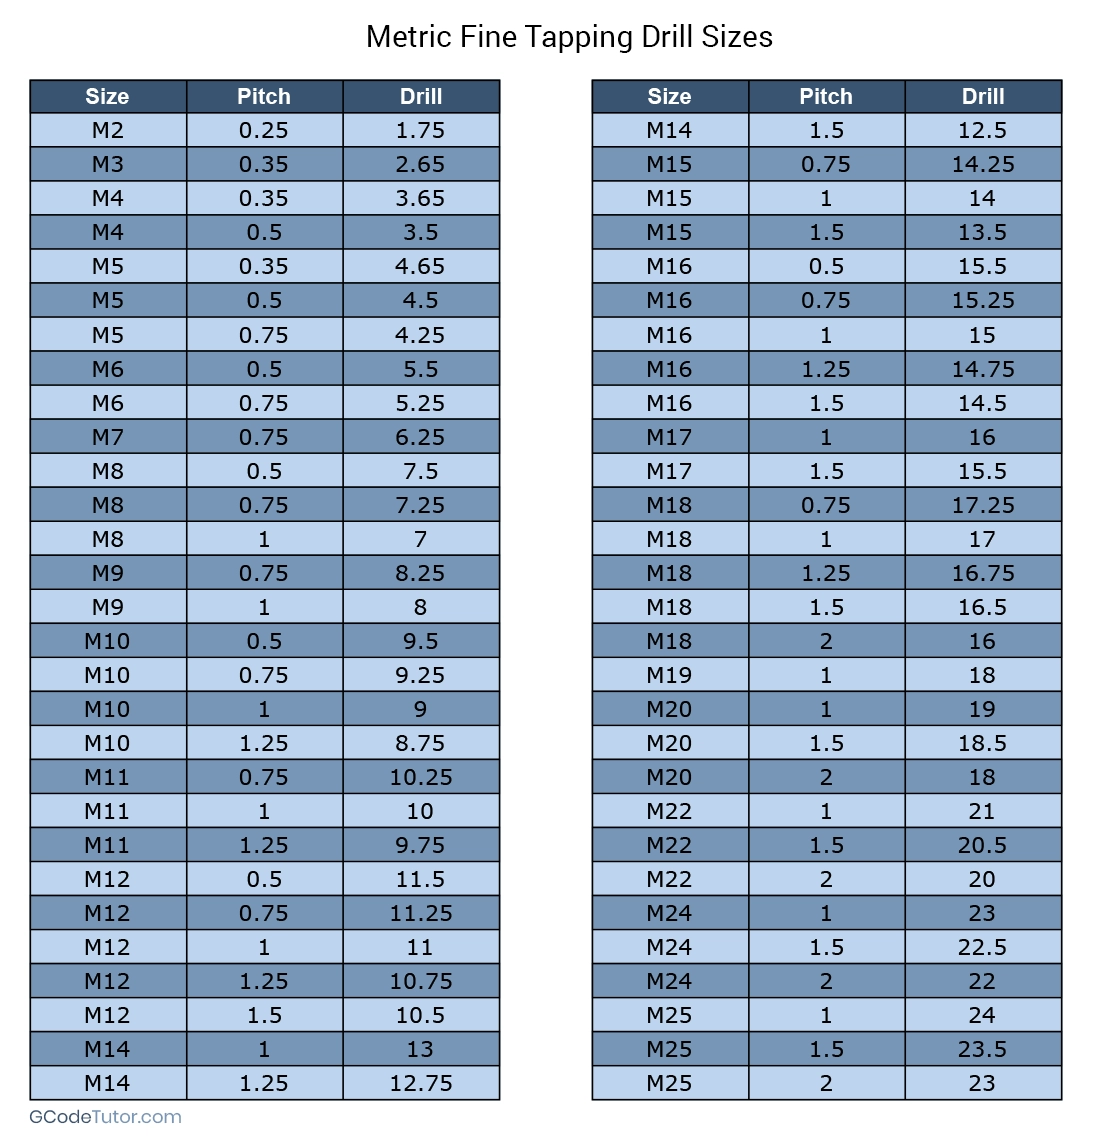
Getting the drill tap size right is key to strong, durable threads. You want to aim for about 75% thread engagement — that sweet spot balances strength and ease of tapping without breaking the tap or stripping threads. Undersized pilot holes create weak threads that strip out under pressure, so sizing matters.
Imperial Drill Tap Size Chart
| Tap Size | Drill Diameter (inches) | Tap Threads per Inch | Typical Material Notes |
|---|---|---|---|
| #6-32 | 0.106 | 32 | cURL Too many subrequests. |
| #8-32 | 0.136 | 32 | cURL Too many subrequests. |
| #10-24 | 0.159 | 24 | cURL Too many subrequests. |
| 1/4-20 | 0.201 | 20 | cURL Too many subrequests. |
cURL Too many subrequests.
| Tap Size | cURL Too many subrequests. | cURL Too many subrequests. | Typical Material Notes |
|---|---|---|---|
| cURL Too many subrequests. | 2.5 | 0.5 | cURL Too many subrequests. |
| cURL Too many subrequests. | 3.3 | 0.7 | cURL Too many subrequests. |
| cURL Too many subrequests. | 5.0 | 1.0 | cURL Too many subrequests. |
| cURL Too many subrequests. | 8.5 | 1.5 | cURL Too many subrequests. |
cURL Too many subrequests.
cURL Too many subrequests.
Common Pitfalls to Avoid
- cURL Too many subrequests.
- cURL Too many subrequests.
- Ignoring pitch and thread type differences between metric and imperial sets.
The right drill tap size paired with proper thread engagement ensures your project’s threads stay strong and reliable, whether you’re working on DIY home repairs or professional-grade tasks.
How to Use a Drill Tap Step by Step Guide for Beginners and Pros
Using a drill tap is pretty straightforward once you get the hang of it. Here’s a simple step-by-step to help you drill and tap holes cleanly, whether you’re new or experienced.
Prep Your Work
- Pick the right drill tap for your material—HSS for metals, carbon steel for softer stuff.
- Mark the exact spot where you want to drill.
- Clamp or secure your workpiece so it won’t move during the process.
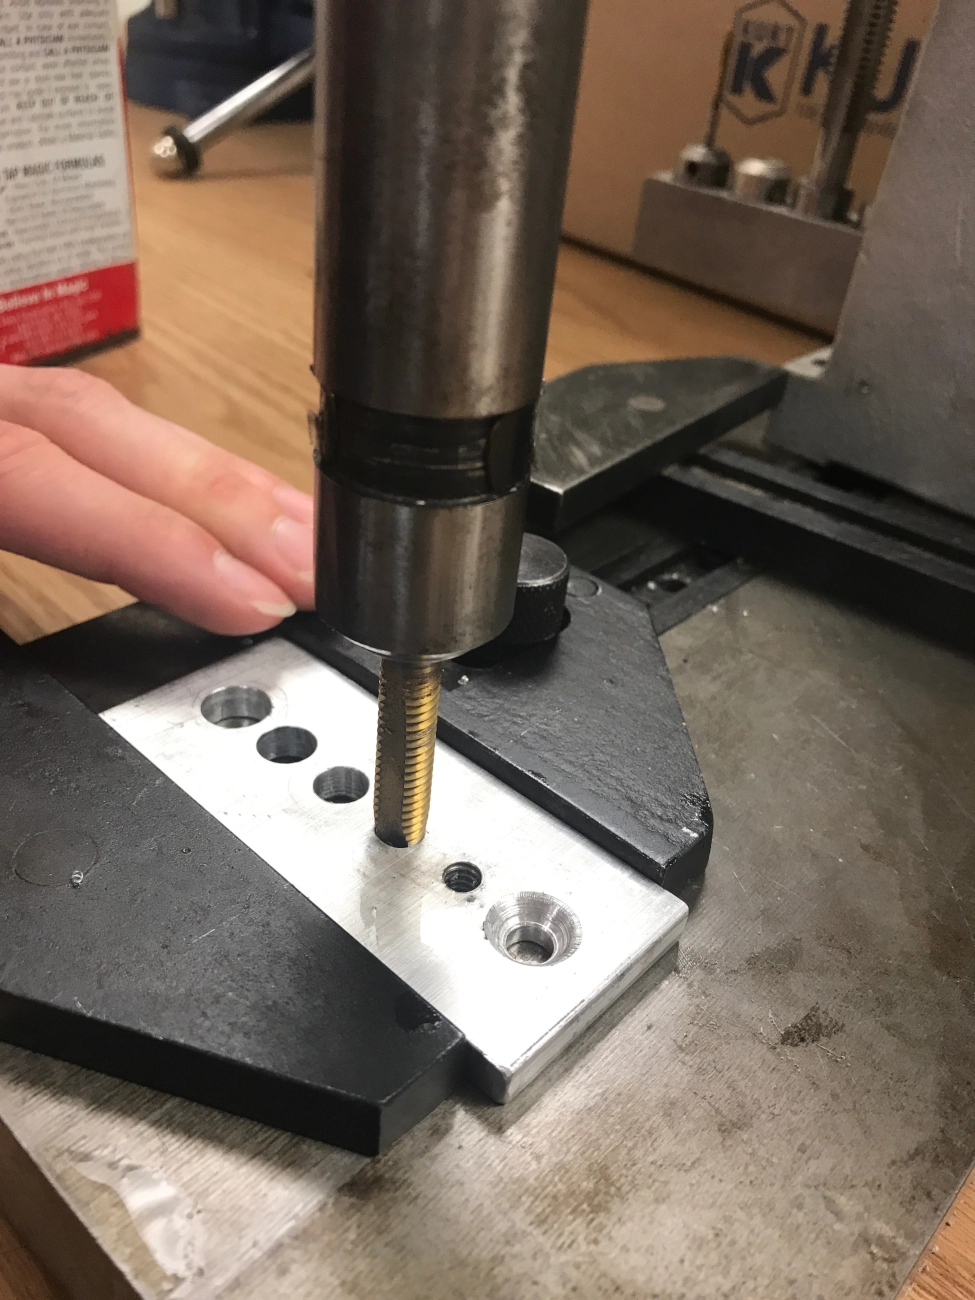
Step 1 Drill the Pilot Hole
- Use a low speed between 300 to 500 RPM on your cordless drill or drill press.
- Apply a good-quality cutting lubricant like Tap Magic to reduce friction and keep the bit cool.
- Drill straight to the correct depth without rushing.
Step 2 Tap the Threads
- Switch to the tap end of your drill tap.
- Tap at a slow speed, and crucially, reverse the tap every half turn to break chips and clear debris.
- This back-and-forth motion helps prevent breaking the tap and keeps threads clean.
Step 3 Finish Up
- Use a countersink bit or a deburring tool to clean the edge of the hole, removing any sharp burrs.
- Test the threads with the correct bolt or screw to make sure everything fits snugly.
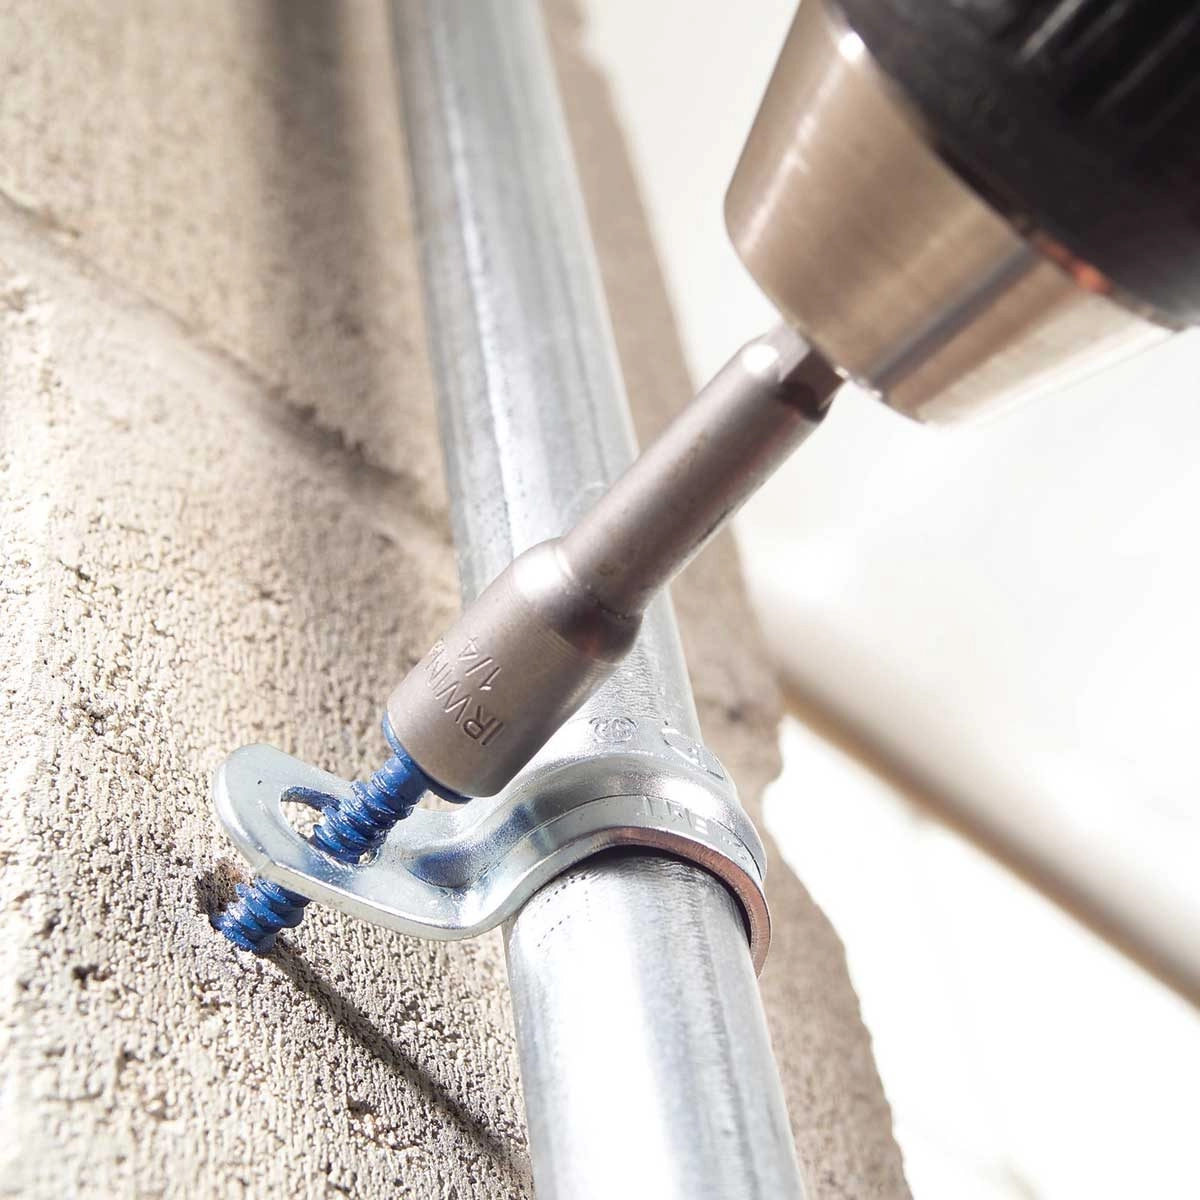
Tools You’ll Need
- Cordless drill with 18-volt or higher for enough power.
- Cutting oil or lubricant specifically for taps.
- Safety gear like goggles and gloves to protect yourself.
Tips for Power Tools
- Adjust your drill’s clutch setting to avoid over-torquing and breaking the tap.
- Keep speeds low and steady—fast spinning can damage both the tap and the material.
Following these basics will make your drilling and tapping cleaner, faster, and safer every time.
Best Practices and Pro Tips Maximizing Efficiency and Avoiding Breakage
Getting the most from your drill tap means working smart and steady. Here’s how to maximize efficiency and avoid the common pitfalls that lead to breakage.
cURL Too many subrequests.
- cURL Too many subrequests. cURL Too many subrequests. cURL Too many subrequests.
- Use cURL Too many subrequests. cURL Too many subrequests.
cURL Too many subrequests.
- For cURL Too many subrequests.cURL Too many subrequests.
- For cURL Too many subrequests.cURL Too many subrequests.
cURL Too many subrequests.
- cURL Too many subrequests.
- cURL Too many subrequests. cURL Too many subrequests. cURL Too many subrequests.
Scaling Up
- cURL Too many subrequests. cURL Too many subrequests. cURL Too many subrequests.
cURL Too many subrequests.
- cURL Too many subrequests.
Following these best practices helps keep your drill tap in prime shape, saves money on replacements, and gets your projects done faster and cleaner.
Common Mistakes with Drill Taps and How to Fix Them
Using drill taps can speed up your threading jobs, but a few mistakes can cause big headaches. Here are the top screw-ups and how to fix them:
Mistake 1 Over-torquing
- Symptom: Bit snaps or breaks inside your workpiece.
- cURL Too many subrequests. Use a drill or driver with an adjustable clutch setting. Keep torque low when tapping to avoid breaking the tap. If your drill doesn’t have a clutch, slow down and feel for resistance.
Mistake 2 Wrong Angle
- Symptom: Misaligned threads, making bolts hard to fit or strip easily.
- cURL Too many subrequests. Use a drill press or a guide block to keep your drill tap perfectly straight. Handheld use is okay, but a guide prevents angle mistakes that ruin threads.
Mistake 3 Skipping Lubrication
- Symptom: Heat buildup, rough cuts, and faster wear on your tap bit.
- cURL Too many subrequests. Always apply cutting oil or a specialized lubricant like Tap Magic during drilling and tapping. Vast offers easy-to-use oil applicator kits that keep your bits cool and lasting longer.
Real-User Stories
On Reddit and tool forums, plenty of people swear that fixing these mistakes saved their projects. One user said switching to an adjustable clutch drill prevented breaking taps while wiring their electrical panel.
Prevention Checklist
Download our free checklist from Vast to remember these tips every time you tap. It covers clutch settings, lubrication, angle guides, and more—perfect if you want to avoid downtime or wasted bits.
Avoid these common pitfalls and your drill tap experience will be way smoother.
Drill Tap Applications From DIY Home Repairs to Workshop Essentials
Drill taps are super handy whether you’re fixing things around the house or working on serious projects in the shop. For DIYers, they’re perfect for tasks like mounting shelves or installing M6 brackets in furniture and auto repairs. The combination of drilling and tapping in one step saves time and keeps things accurate.
On the professional side, drill taps come in handy with electrical panels, light aerospace prototypes, and other light-duty metalwork where precision is key but heavy machines aren’t needed. They streamline threading and reduce equipment hassle in these settings.
Case study: Using a vast five-piece drill tap set, one local garage builder slashed their install time by 40%. This set made quick work of threaded holes, cutting down steps and mistakes on thin metal parts.
When to use separate tools: If you’re working with thick or heavy stock — anything over a quarter inch — stick with the traditional two-step drilling and tapping tools. Drill taps work best on thinner metals where the pilot hole and thread can form cleanly in one go.
Future trends: Look for titanium-coated drill taps coming to market. These bits offer longer life and better wear resistance, making them a solid investment for anyone tapping regularly in aluminum, steel, or mixed materials.
For local users wanting reliable, fast drill tapping, vast’s line of combo drill tap sets fits the bill—saving time and hassle on a wide range of projects.
Top Drill Tap Recommendations Shop Vast for Durable Precision Tools
If you’re ready to invest in reliable drill taps, Vast offers three standout kits that cover a range of needs and budgets:
- Budget Kit
- Six-piece imperial set
- Price: $29.99
- Great for basic projects and occasional use
- HSS construction, decent durability
- Pro Metric Combo
- Includes both metric and imperial sizes
- Price: $49.99
- Ideal for mixed projects
- Better-quality steel with improved heat resistance
- Ultimate HSS Titanium Set
- cURL Too many subrequests.
- cURL Too many subrequests.
- cURL Too many subrequests.
- cURL Too many subrequests.
| cURL Too many subrequests. | Price | Material | Pros | Cons |
|---|---|---|---|---|
| cURL Too many subrequests. | $29.99 | cURL Too many subrequests. | cURL Too many subrequests. | cURL Too many subrequests. |
| Pro Metric Combo | $49.99 | cURL Too many subrequests. | cURL Too many subrequests. | cURL Too many subrequests. |
| cURL Too many subrequests. | $79.99 | cURL Too many subrequests. | cURL Too many subrequests. | cURL Too many subrequests. |
cURL Too many subrequests.
cURL Too many subrequests.
cURL Too many subrequests.
- cURL Too many subrequests.cURL Too many subrequests.
- Warranty: Vast offers a lifetime guarantee, so you can trust your investment for years to come.
- cURL Too many subrequests.: Check if your tools support clutch settings to avoid stripping when using power drills.
Ready to upgrade your toolbox? Get 15% off your first Vast drill tap set. Find the link in our bio and start tapping with confidence today!