Learn how to cast aluminum at home with step-by-step guides on furnaces molds melting pouring and safety for beginners and DIYers.
If you’ve ever wanted to try metal casting aluminum at home—but felt overwhelmed by all the techniques, tools, and safety gear—this guide is exactly what you need. Casting aluminum is perfect for beginners thanks to its relatively low melting point and the abundance of scrap you can source cheaply or even free. Whether you want to create custom parts, art pieces, or practical workshop items, mastering the basics of aluminum casting will open up a whole new world of DIY possibilities.
In this post, you’ll get clear, actionable steps on how to build your own furnace, pick the right mold materials, melt and pour aluminum safely, and avoid the common pitfalls many beginners face. Plus, we’ll break down the best home casting methods—from simple green sand casting aluminum to more advanced lost foam techniques—so you can find the perfect fit for your skill level and project goals. Ready to start your backyard foundry journey? Let’s dive in!
Safety First – Non-Negotiable Rules for Aluminum Casting
When it comes to metal casting aluminum, safety isn’t just important—it’s absolutely non-negotiable. Molten aluminum runs at around 1,220 °F (660 °C), and even small splashes can cause serious burns or start fires. So before you light that furnace, gear up and follow these critical safety rules.
PPE Checklist: Gear Up Like a Pro
- Leather gloves (not synthetic!) to protect hands from heat and sparks.
- Face shield to guard against molten metal splashes and flying debris.
- Foundry apron made from leather or heavy-duty canvas to shield your body.
- Long-sleeve cotton clothes—synthetic fabrics melt fast and stick to skin.
- Respirator mask if you’re melting scrap or using flux; fumes can be hazardous.
- Closed-toe leather boots to protect feet from spills and falling objects.
- Safety glasses under your face shield for added eye protection.
Never skip any of these. Half measures here can lead to costly injuries.
Fire Prevention — Moisture Is Your Enemy
- Absolutely no moisture anywhere near your furnace or metal! Water hitting molten aluminum causes explosive steam bursts that can throw molten metal everywhere.
- Dry your scrap metal thoroughly before melting. Store all materials in a dry environment.
- Keep a fire extinguisher rated for metal fires (Class D) within easy reach.
Ventilation & Workspace Setup
- Always work in a well-ventilated area or outdoors. Melting aluminum and fluxes release fumes that can be harmful if inhaled.
- Avoid confined spaces; open air reduces risk of toxic buildup and fire hazards.
- cURL Too many subrequests.
cURL Too many subrequests.
- cURL Too many subrequests., cURL Too many subrequests.cURL Too many subrequests.
- cURL Too many subrequests.
- cURL Too many subrequests.
cURL Too many subrequests.
cURL Too many subrequests.
cURL Too many subrequests.
| cURL Too many subrequests. | cURL Too many subrequests. | cURL Too many subrequests. | Best For |
|---|---|---|---|
| cURL Too many subrequests. | cURL Too many subrequests. | cURL Too many subrequests. | cURL Too many subrequests. |
| cURL Too many subrequests. | cURL Too many subrequests. | cURL Too many subrequests. | cURL Too many subrequests. |
| Lost-Foam Casting | No need for sand, complex shapes | Requires foam patterns, cleanup | Intricate shapes, smooth finish |
| Lost-PLA / Investment | High detail, smooth surface finish | Time-consuming, expensive materials | Fine detail, small parts |
| Basic Die Casting (DIY) | Fast production, smooth parts | Requires steel dies, advanced skills | Small runs, precision parts |
cURL Too many subrequests.
This is the go-to for beginners. You mix sand, clay, and water to form a mold around your pattern. It’s affordable and quick, perfect for backyard metal casting projects. Expect a rougher surface but great for learning the basics.
Petrobond / Oil-Bonded Sand
If you want better detail and a tougher mold than green sand, petrobond is your friend. It uses an oil binder instead of water, giving crisper details and smoother surfaces but costs more. Good if you’re stepping up your game.
Lost-Foam Casting
Using styrofoam patterns that vaporize when the aluminum is poured, lost-foam lets you cast complex shapes without traditional sand molds. It’s neat but requires careful pattern prep and is a bit messier.
Lost-PLA / Investment Casting
This method is great for super detailed parts. You print or carve a PLA pattern, then invest it in a ceramic shell before melting the pattern out. You get smooth, detailed castings but it’s more involved and expensive.
Basic DIY Die Casting
For the advanced metal caster ready to build steel dies, die casting offers fast turnaround and precision. It’s costly in time and materials but great for small batches where finish and accuracy matter.
Pick your method based on what fits your project, skill, and budget. For most backyard metal casting fans, green sand or petrobond is the best starting place.
Building or Buying a Melting Furnace
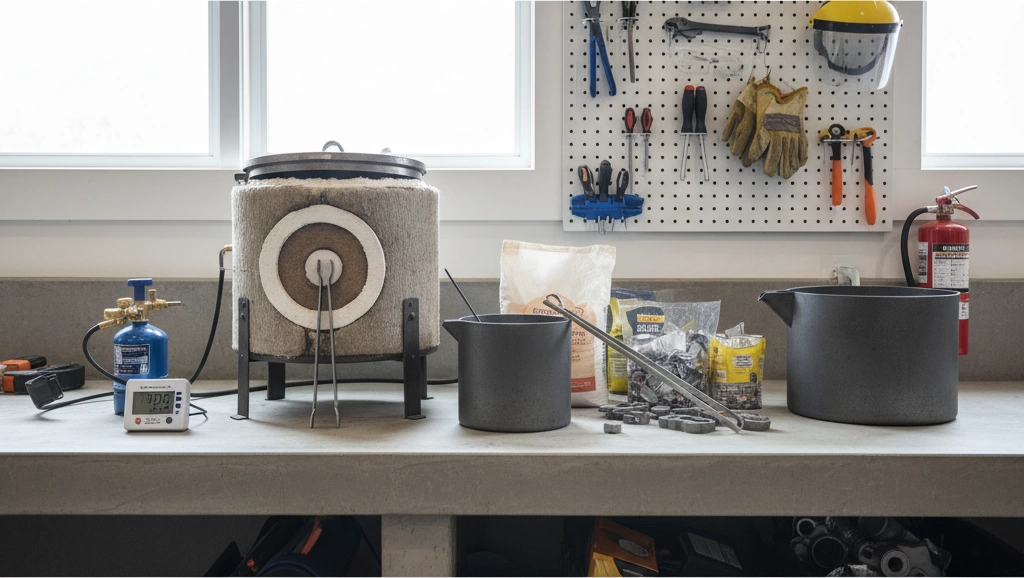
When it comes to aluminum metal casting, a good melting furnace is key. You can either build your own or buy an affordable commercial option.
DIY Furnace Options
- Coffee Can Furnace with Satanite: Use a sturdy metal can lined with Satanite (a heat-resistant refractory). It’s simple and budget-friendly for beginners.
- Gingerbread Furnace: Made with firebrick and a propane burner, this furnace holds heat better and melts aluminum faster. Great for backyard metal casting.
- Propane or Waste-Oil Burners: If you want more power, some folks build burners fueled by waste oil or propane for more consistent heating.
Affordable Commercial Furnaces
If you want something ready to go, several furnaces under $400 work well for hobbyists and small shop use. These usually come with built-in insulation and easy temperature control, making them safer and more reliable.
Crucible Choices
- Steel Crucibles: Tough and cheap but wear out faster at high temps. Good for short-term use.
- Graphite-Clay Crucibles: More durable and better heat retention, plus cleaner melts. Ideal for repeated aluminum melting.
- Sizes A10 to A20: For most home projects, A10 or A15 size crucibles hold enough metal without being too bulky.
Choosing the right furnace and crucible depends on your budget, space, and how often you plan to cast aluminum. DIY setups work great if you want to keep costs low, but commercial furnaces add convenience and safety when you’re ready to level up.
Sourcing and Preparing Aluminum Scrap
cURL Too many subrequests.
cURL Too many subrequests.
- cURL Too many subrequests.cURL Too many subrequests.
- cURL Too many subrequests.
- cURL Too many subrequests.
cURL Too many subrequests.
- cURL Too many subrequests.
- cURL Too many subrequests.
- cURL Too many subrequests.
cURL Too many subrequests.
cURL Too many subrequests.
cURL Too many subrequests.
cURL Too many subrequests.
cURL Too many subrequests.
- cURL Too many subrequests.
- cURL Too many subrequests.
- cURL Too many subrequests.
cURL Too many subrequests.
Petrobond Sand Mixing Ratios
Petrobond, or oil-bonded sand, is great for finer detail and smoother finishes. Mix about 10 parts sand with 1 part petrobond oil, then add 1 to 2 parts kitty litter or grog to reduce shrinkage. The texture should feel like damp play-dough.
Pattern Making for Aluminum Casting
Patterns form the shape of your casting and can be:
- Wood: Easy, cheap, and good for simple shapes.
- 3D-printed: Great for complex designs and consistent details.
- Found objects: Household items or machined parts you want to copy.
Make sure your patterns have proper draft angles—a slight taper (1° to 3°) on sides so they release from the mold easily without damaging the sand.
Risers, Sprues & Gating Systems
These help control metal flow and avoid defects:
- Sprue: The main path where molten aluminum enters the mold.
- Gates: Smaller channels that direct metal into different parts of the mold.
- Risers (or feeders): Extra reservoirs of molten metal feeding the casting as it cools to prevent shrinkage holes.
Think of your gating like plumbing: smooth, short, and direct paths work best.
Two-Part Flasks vs Open Pour Molds
- Two-part flasks: Common for green sand and petrobond molds. The flask holds the sand under pressure, keeping it tight around your pattern for better detail and fewer defects.
- Open pour molds: Used more in lost-foam casting or simple setups. You pour metal directly into an open cavity, but it’s trickier to control detail and flow.
Lost-Foam Pattern Coating Tips
For lost-foam aluminum casting, coat your foam pattern with a thin layer of drywall compound or a diluted ceramic slurry. This helps:
- Reduce foam burning too fast
- Improve surface finish on the casting
Just brush on a few thin coats and let it dry completely before placing in your sand.
With these mold-making basics, you’ll get clean, detailed aluminum castings without the headache.
Remember, good molds mean less cleanup and defects later on!
Melting & Pouring Aluminum

When metal casting aluminum, getting your melt right is key. Aim for a temperature between 660–750 °C (1220–1380 °F). This range ensures the aluminum is fully liquid and easy to pour, but not so hot it burns off or causes excessive dross.
How to Know It’s Ready
Use the fluidity test cURL Too many subrequests.
cURL Too many subrequests.
cURL Too many subrequests.
cURL Too many subrequests.
cURL Too many subrequests.
cURL Too many subrequests.
cURL Too many subrequests.
cURL Too many subrequests.
cURL Too many subrequests.
cURL Too many subrequests.
cURL Too many subrequests., cURL Too many subrequests. cURL Too many subrequests.
cURL Too many subrequests.
- cURL Too many subrequests.
- cURL Too many subrequests.
- cURL Too many subrequests.
cURL Too many subrequests.
- cURL Too many subrequests.
- Leave a little extra material to tidy up later for a cleaner finish.
Basic Cleanup Tools
- Belt sander or angle grinder with a flap disc smooths rough edges fast.
- Use files to reach tight spots and fine-tune details.
- A tumbler (vibratory or rotary) can polish smaller castings and remove leftover sand or scale.
Heat Treating for Strength
- Aluminum castings gain strength with heat treatment like T6 (solution heat treatment + aging).
- At home, you can try:
- Heating your casting to around 980°F (527°C) for an hour.
- Quenching it in water immediately after.
- Aging at about 320°F (160°C) for 8 hours.
- This boosts hardness and durability but requires careful temperature control.
Quick Tips
- Always wear gloves and eye protection during breakout and cleanup.
- Keep water nearby when quenching during heat treat for safety.
- Practice makes perfect—start with smaller castings to get comfortable.
Following these steps ensures your aluminum casting comes out strong, clean, and ready for use or further machining.
Troubleshooting Common Aluminum Casting Defects
When you’re metal casting aluminum, defects happen but most can be fixed or prevented easily. Here’s a quick guide to the usual problems and how to handle them.
Shrinkage Porosity
What it is: Tiny holes or voids caused by aluminum shrinking as it cools.
Fixes & Prevention:
- Add risers to feed molten metal during solidification.
- Pour at the right temperature (660–750 °C).
- Use chillers or thicker molds to control cooling rates.
Cold Shuts & Misruns
What it is: Cold shuts are rough or incomplete fusion lines; misruns are incomplete fills in the mold.
Fixes & Prevention:
- Keep aluminum melt hot enough for proper flow.
- Pour smoothly and steadily without stopping.
- Design gates and sprues for good metal flow.
Sand Inclusions
What it is: Bits of sand trapped inside the casting, weakening it and making surfaces rough.
Fixes & Prevention:
- Use well-prepared green sand or Petrobond with correct moisture.
- Compact molds firmly and avoid excess moisture.
- Filter molten metal or skim dross before pouring.
Gas Bubbles
What it is: Trapped gas in the casting, causing holes or blisters.
Fixes & Prevention:
- cURL Too many subrequests.
- cURL Too many subrequests.
- cURL Too many subrequests.
cURL Too many subrequests.
cURL Too many subrequests.
cURL Too many subrequests.
cURL Too many subrequests.
- cURL Too many subrequests. cURL Too many subrequests.
- cURL Too many subrequests. cURL Too many subrequests.
- cURL Too many subrequests. cURL Too many subrequests.
- cURL Too many subrequests. cURL Too many subrequests.
cURL Too many subrequests.
- cURL Too many subrequests.
- cURL Too many subrequests.
- cURL Too many subrequests.
- Estimated total: $1 to $2 per pound of finished aluminum casting.
Overall, once set up, backyard metal casting with aluminum is affordable and scalable. Keep an eye on scrap sourcing and furnace efficiency to lower costs even more.
Projects to Try First with Difficulty Ratings
Starting with simple projects helps you get comfortable with aluminum casting before moving on to more complex pieces. Here’s a quick list of beginner-friendly to advanced projects, along with their difficulty levels:
- Simple Flat Plaque – cURL Too many subrequests.
Great for practicing green sand casting. You’ll get used to mold-making, pouring, and cleaning up without complicated shapes. - Belt Buckle – Easy to Medium
Adds some detail and shaping to your work. Perfect for mastering sprues and gating systems while creating a useful item. - Custom Shifter Knob – cURL Too many subrequests.
Involves more precise pattern work and a cleaner finish. Great for trying lost-foam or petrobond casting if you want smoother surfaces. - Small Pulley or Bracket – Medium to Hard
These need stronger molds and careful pouring to avoid defects. Good for practicing cooling control and finishing. - Complex Lost-Foam Engine Part – Hard
This one’s for advanced casters. Requires perfect foam patterns, proper coating, and careful melt handling. Great challenge if you want to push your skills.
Starting simple lets you build up your confidence and skills safely. Each project teaches a little more about aluminum sand casting and homemade foundry work, making your backyard metal casting fun and productive.
Advanced Tips & Upgrades for Metal Casting Aluminum
Once you’re comfy with basic aluminum sand casting, these advanced tips can level up your results and open new doors for your home aluminum foundry.
- Add Silicon for Better FlowBoost your aluminum’s fluidity by adding a bit of silicon. This helps the molten metal fill fine details and reduces defects like cold shuts. Use around 5-12% silicon in your alloy for smoother pours and tighter molds.
- Alloying with Copper for Bronze-Like PropertiesMixing some copper into your aluminum creates a stronger, bronze-like alloy. This gives your casting better wear resistance and a unique finish for projects like custom pulleys or artistic pieces.
- Vacuum or Pressure Assist at HomeFor serious hobbyists, setting up a vacuum chamber or pressure system can drastically reduce gas bubbles and shrinkage porosity. It’s an upgrade that improves casting quality but requires a bit of DIY skill and some specialized gear.
- Switching to Bronze or Brass LaterOnce you master aluminum casting, consider branching out to bronze or brass. These metals need higher melting temperatures but offer different aesthetics and mechanical properties for more advanced projects.
These upgrades can make your backyard metal casting more precise, durable, and versatile—perfect for those ready to push beyond the basics.