Discover expert insights on plastic mold parts including key components design tips and material selection for precise injection molding success.
The Anatomy of Plastic Mold Parts
Understanding the core components of plastic mold parts is crucial for anyone involved in injection molding. Let’s break down the key elements that make up a high-quality mold:
Mold Cavities and Cores
These are the heart of the mold. The mold cavity shapes the outside of the part, while the core forms the inside surfaces. Together, they define the final plastic part’s geometry. Their precision directly impacts part accuracy and finish.
Runners and Gates
Runners are channels that guide molten plastic from the injection nozzle to the cavities. Gates connect runners to the cavities and control the flow of plastic entering the mold. Proper design here ensures consistent filling and minimizes waste.
Ejector Pins and Plates
After cooling, ejector pins push the finished part out of the mold. These pins are mounted on ejector plates, which move as a system. Well-placed pins prevent part damage and speed up cycle times.
Cooling Channels and Sprue Bushings
Cooling channels circulate coolant through the mold, rapidly solidifying the plastic. Efficient cooling reduces cycle time and improves part quality. The sprue bushing guides the plastic from the injection nozzle into the runners, making sure the material enters smoothly.
Inserts and Slides
Inserts allow for interchangeable parts inside the mold, ideal for different surface finishes or quick repairs. Slides handle undercuts or complex features that can’t be molded with straight opening molds, improving design flexibility.
By understanding these components—mold cavities and cores, runners and gates, ejector systems, cooling channels, and inserts—you get a clearer picture of how precision and efficiency come together in plastic mold parts.
Material Selection for Plastic Mold Parts
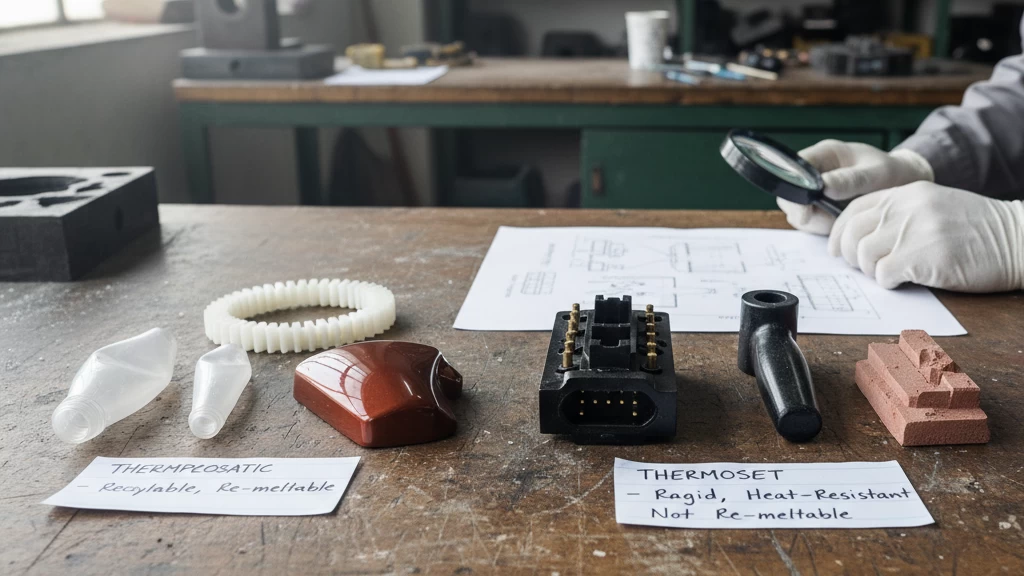
Choosing the right material for plastic mold parts is crucial. First, you need to know the basics: thermoplastics vs. thermosets.
- Thermoplastics soften when heated and harden when cooled, making them easy to mold and recycle. They’re great for most injection molding projects.
- Thermosets harden permanently after heating and can’t be remelted. They offer better heat resistance and strength but are less common in typical plastic mold parts.
Here are some top materials used in the U.S. market:
- ABS (Acrylonitrile Butadiene Styrene): Tough and lightweight, with good impact resistance. Popular in consumer goods and automotive parts.
- Polycarbonate (PC): Strong and clear, used for durable parts needing transparency, like medical devices and electronics.
- Polypropylene (PP): Flexible, chemical-resistant, and cost-effective. Often used for packaging and household items.
- POM (Acetal): Offers excellent stiffness and low friction — a favorite for gears and mechanical components.
How to Pick the Right Material?
- Consider your product’s environment: For hot or humid climates, materials like PC or thermoset plastics handle heat better. In dry, cooler areas, ABS or PP usually do fine.
- Think about durability vs. cost: Need parts that last longer? POM or PC are solid choices, but they cost more. For budget-friendly runs, ABS and PP work well.
- Look at regulatory requirements: Medical and food-grade parts need FDA-compliant materials, so double-check certifications.
- Local climate impacts: In the U.S., regions with extreme temperatures (like the Southwest or Midwest) benefit from materials that resist expansion and contraction to avoid warping.
Making the right material call upfront saves time and money down the road — plus it keeps your parts performing reliably in any U.S. setting.
Design Best Practices for Flawless Plastic Mold Parts

Getting the design right is key to perfect plastic mold parts that perform well and look great. Here are some must-follow tips:
- Wall Thickness Guidelines: Keep wall thickness consistent to avoid sink marks, warping, and uneven cooling. For most thermoplastics, a thickness between 0.04” to 0.12” works well. Thinner walls speed up cycles but may affect strength.
- Draft Angles and Radii: Adding draft angles (at least 1–2 degrees) helps parts release smoothly from mold cavities. Rounded edges (radii) reduce stress concentrations and improve flow during injection.
- Undercuts and Ribs: Avoid complex undercuts when possible—they complicate mold design and add cost. Use side actions or slides if undercuts are necessary. Ribs add strength and reduce warping—keep ribs 40–60% of wall thickness to avoid sink marks.
- Tolerances and Venting: Set realistic tolerances based on part size and function; tighter tolerances increase cost. Proper venting prevents trapped air, reducing burn marks and incomplete fills.
- Common Pitfalls: Watch out for inconsistent wall thickness, sharp corners, and no draft angles—these often lead to warping, sticking parts, or short shots.
Case Study: Cutting Defects by 30%
A U.S.-based manufacturer redesigned their consumer product’s plastic mold parts using these best practices. By adjusting wall thickness for uniformity and adding proper draft angles, they cut defect rates by 30% and reduced cycle times by 15%. This saved them thousands per year in scrap and rework.
Following these design basics ensures your plastic mold parts come out flawless and ready for high-volume production without headaches.
The Injection Molding Process for Plastic Mold Parts
Injection molding starts with melting plastic pellets until they’re liquid enough to fill the mold. Here’s a quick look at the main steps:
- Melting: Plastic pellets heat up and melt inside the injection barrel.
- Injection: The molten plastic is pushed through runners and gates into the mold cavities.
- Cooling: The material cools down using cooling channels built into the mold to solidify the part.
- Ejection: Ejector pins and plates push the finished part out of the mold.
When it comes to tooling, you’ll often choose between steel and aluminum molds. Steel molds last longer and handle high-volume runs well but cost more upfront. Aluminum molds are cheaper and faster to make, perfect for prototyping or short runs.
Don’t skip quality checkpoints like mold cavity inspection, temperature control, and cycle timing to catch defects early.
For scaling production, start with prototypes using faster aluminum molds, then switch to steel for bigger runs. To boost efficiency in high-volume production:
- Use family molds to produce multiple parts in one cycle.
- Optimize runner and gate design for faster fill times.
- Automate ejection and part handling to reduce cycle time.
These proven steps help keep your plastic mold parts consistent, cost-effective, and built to meet U.S. industry standards.
Applications and Industry Examples of Plastic Mold Parts
Plastic mold parts play a crucial role across many industries here in the U.S., each with unique demands and standards.
Automotive Parts and Lightweighting
Car makers rely on plastic mold parts to reduce weight, boost fuel efficiency, and cut costs. Components like dashboards, bumpers, and under-the-hood covers use strong yet lightweight thermoplastics. Lightweighting with plastics also helps meet strict emissions and safety standards.
Consumer Goods Examples
Everyday items—from kitchen tools to electronic housings—depend on reliable injection mold components. Custom plastic molding delivers durability and design flexibility for products like phone cases, toys, and home appliances. The quick turnaround and cost-effectiveness appeal to manufacturers nationwide.
Medical and Electronics Uses
Healthcare devices and electronics require precision plastic parts built to tight tolerances. Injection molding creates sterile, high-quality components for diagnostic gear, connectors, and wearable devices. Materials must be biocompatible and resistant to wear, making material choice critical.
Emerging Trends Like Bio-Plastics
Sustainability is gaining momentum, pushing bio-plastics into the spotlight. These renewable materials offer eco-friendly alternatives for mold parts, especially in packaging and disposable items. U.S. companies are increasingly adopting bioplastics to meet consumer demand for greener products.
Regional Aerospace Sector Spotlight
The aerospace industry in the U.S. uses precision-molded plastic parts for lightweight, high-strength components inside cabins and control systems. Complex mold cavity designs help create parts that meet rigorous performance standards while supporting overall weight reduction efforts.
Across these sectors, plastic mold parts remain essential, offering versatility and efficiency tailored to U.S. market needs.
Cost Factors and Optimization Strategies for Plastic Mold Parts
When it comes to plastic mold parts, understanding the cost drivers is key. Here’s a straightforward breakdown:
- Tooling Costs: This is often the biggest chunk. Custom molds, especially steel ones, can be pricey but last longer than aluminum. The complexity of mold cavities, inserts, and slides also affects cost.
- Material Costs: Different thermoplastic materials like ABS, Polycarbonate, or POM vary in price. Your choice depends on part function and local climate conditions in the U.S.
- Run Volumes: Larger production runs cut the cost per part dramatically. High-volume injection parts benefit the most from upfront tooling investments.
Savings Tactics
- Family Molds: Combine multiple parts in one mold to share tooling costs and speed up production.
- Local Sourcing: Using nearby U.S. suppliers cuts shipping expenses, supports faster turnaround, and reduces delays.
- Design for Cost: Keep wall thickness uniform, simplify runners and gate systems, and avoid undercuts that add complexity and cost.
ROI Calculator Formula (Simple)
To estimate your return on investment (ROI) for mold tooling:
ROI = (Savings per part × Number of parts) – Tooling Cost
If the result’s positive, your mold investment pays off.
Vast’s Value-Add for Quick Quotes and Prototyping
At Vast, we offer rapid prototyping paired with transparent quoting. This helps you test designs early, avoid costly revisions, and get accurate cost estimates tailored to your production plans in the U.S. market.
By focusing on key cost areas and smart strategies, you can optimize your plastic mold parts projects for both quality and budget.