Discover expert insights on facing milling machines including process steps, tool selection, speeds, feeds, and tips for precise flat surface machining.
If you’ve ever worked with milling machines, you know that achieving perfectly flat, smooth surfaces is non-negotiable—and that’s exactly where a facing milling machine comes into play. This essential setup is a go-to in manufacturing and hobbyist shops alike, designed specifically to create flawless faces on metal, plastic, or composite workpieces. Whether you’re prepping stock for assembly or chasing that mirror finish, mastering the face milling process can transform your machining game. Ready to cut cycle times, improve surface quality, and troubleshoot like a pro? Let’s dive into everything you need to know about facing milling machines—from tools and techniques to speed and feed secrets that get the job done right every time.
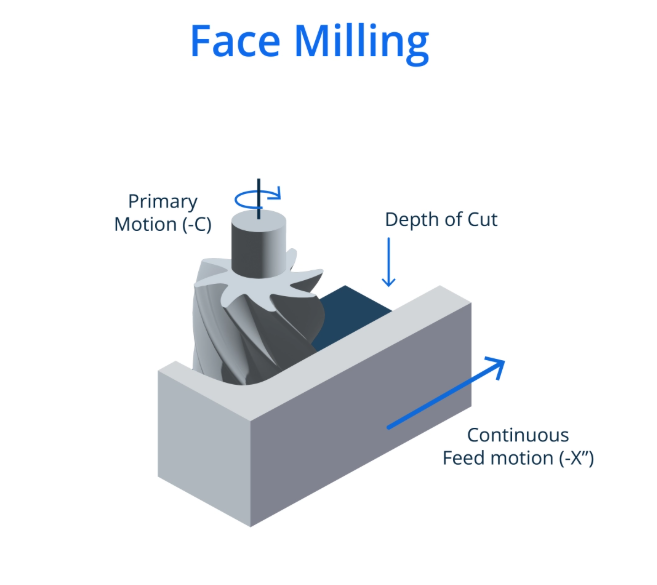
What Is Face Milling Defining the Process and Its Fundamentals
Face milling is a machining process that uses a rotating cutter to remove material from the surface of a workpiece, creating a flat, smooth face. Unlike lathe facing, where the cutting tool moves along the axis of a rotating workpiece, face milling involves a cutter spinning on an axis perpendicular to the workpiece surface. This setup allows for efficient material removal over a broad area, making it ideal for preparing flat surfaces or reducing thickness.
Historically, face milling has evolved significantly. It began with manual machines and simple cutters, requiring skilled operators to maintain consistent surface quality. Today, CNC technology provides precise tool paths, automatic feed controls, and optimized speeds and feeds, greatly improving efficiency and repeatability.
The core principles behind face milling focus on material removal mechanics. The cutter’s teeth or inserts engage the workpiece by shearing off chips perpendicular to the material surface. This orientation reduces cutting forces and promotes smoother finishes. Proper chip formation is essential to avoid tool wear and surface defects.
A common misconception is confusing a facing milling machine with general milling machines. While all milling machines can perform face milling, a facing milling machine emphasizes cutter orientation and application specifically for flat surface generation. This distinction helps clarify tool selection, setup, and machining strategy to achieve the best results.
Understanding these fundamentals sets the foundation for effective use of face milling in diverse applications, from rough flattening to fine finishing.
How Face Milling Works Step by Step on a Milling Machine
Face milling starts with setting up your workpiece securely. Proper clamping is key—using solid fixtures or a vise ensures the part doesn’t move during cutting. For small shops, make sure your vise jaws are aligned evenly to avoid tilting or uneven cuts. A quick trick is to use parallels or soft jaw inserts to protect the workpiece and keep it level.
Next, tool alignment is critical. The cutter’s axis needs to be perfectly perpendicular to the workpiece surface to get that smooth flat finish. Whether you’re running a manual machine or a CNC, double-check your tool setup before you start feeding material. On manual mills, this means carefully adjusting the head tilt or quill; on CNCs, you just set your tool offsets and orientation in the program.
The milling itself happens in phases:
- Roughing: Take heavier cuts to remove most of the material fast. Deep axial depth and higher feed rates work here.
- Semi-finishing: Clean up the surface, reduce cutting forces, and prepare for the final finish.
- Finishing: Use light passes with slower feeds to reach surface roughness (Ra) below 1.6 micrometers, which is ideal for tight tolerances and smooth parts.
When it comes to equipment, vertical milling machines are great for face milling jobs, especially for local shops and hobbyists. A horizontal mill or machining center works well too, especially for larger or more complex parts. For most U.S. users, a spindle with around 2HP is plenty to handle typical face milling tasks on metals like aluminum and steel without bogging down.
Keeping these steps in mind helps ensure smooth, accurate faces every time.
Types of Face Milling Operations and When to Use Them
When working with a facing milling machine, it helps to know the different types of face milling operations and the best situations for each.
Conventional Face Milling
This is the go-to method for creating large, flat surfaces quickly. It’s perfect for broad areas where you need a consistent, smooth finish on materials like steel or aluminum. Conventional face milling removes a good chunk of material but leaves a surface ready for further finishing if needed.
Spotfacing
Spotfacing focuses on small, localized areas—typically around bolt holes or where washers will sit. It cleans up these spots to ensure bolts and fasteners fit flush, which is essential for tight assemblies. This operation is common in automotive parts and machinery where precision hole seating is critical.
High Feed Face Milling
This is a roughing method ideal for uneven or wavy stock. If you’re dealing with raw castings or large, irregular parts, high feed face milling removes material faster with less tool pressure. It’s great for aluminum and softer steels when you want to prep the surface before finishing.
Application Table for Face Milling Types
| Milling Type | Material | Best Use | Goal |
|---|---|---|---|
| Conventional | Steel, Aluminum | Large flat surfaces | Rough/Finish |
| Spotfacing | Steel, Aluminum | Bolt holes, small areas | Precision |
| High Feed Face Milling | Aluminum, Soft Steel | Uneven stock roughing | Rough prep |
By understanding these options, you can pick the right face milling approach that matches your material, machine capability, and final part needs—especially handy for U.S. shops balancing quality with cost-efficiency.
Essential Tools and Cutters for Face Milling Success
Choosing the right tools and cutters is crucial for effective face milling. Here’s a simple breakdown of what you need to know:
Cutter Types
- Indexable face mills: These are popular because of their replaceable carbide inserts. Typically, they have a 45-degree lead angle, which balances cutting force and surface finish.
- Shell mills: Great for larger face milling jobs. They’re sturdy but less versatile than indexable mills.
- Fly cutters: Ideal for small shops or hobbyists. They provide excellent surface finishes but run slower compared to multi-insert cutters.
| Cutter Type | Pros | Cons |
|---|---|---|
| Indexable face mills | Fast, versatile, easy insert change | More expensive upfront |
| Shell mills | Rugged, handles larger cuts | Bulkier, harder to set up |
| Fly cutters | Smooth finish, simple design | Slower, limited depth |
Insert Selection and Grades
- Carbide inserts are best for cutting steel and harder metals. They provide good wear resistance and durability.
- For aluminum, PCD (Polycrystalline Diamond) inserts work wonders. They reduce built-up edge and offer clean cuts.
- To get that smooth mirror finish, wiper inserts are a smart choice—they help keep surface roughness below 1.6 micrometers easily.
Vast’s lineup of indexable face mills stands out in the US market, offering up to 20 percent longer tool life than some competitors. This can really cut costs and downtime in your shop.
Accessories You’ll Need
Don’t forget the essentials that keep your setup running smoothly:
- Arbors and collets: Make sure they fit your machine spindle and cutter shank tightly to avoid runout.
- Coolant systems: Depending on your shop’s habits—wet or dry machining—use either flood coolant or air blast. Proper coolant helps extend tool life and improves surface finish.
In short, picking the right cutter and inserts tailored to your material and job type, plus quality accessories, will underline your success in face milling.
Optimizing Parameters Speeds Feeds and Best Practices for Facing Milling Machine

Getting your speeds and feeds right is key to a smooth, efficient face milling process. Here’s what I’ve found works best, especially for shops in the U.S.:
Calculating RPM and Feed Rate
- Use the basic formulas:
- RPM = (Cutting Speed × 12) / (π × Cutter Diameter) (cutting speed in surface feet per minute)
- Feed Rate = RPM × Number of Teeth × Feed per Tooth
- For face milling, a good starting point for feed per tooth is around 0.015 to 0.028 inches (about 0.4 to 0.7 mm). This range works well for most materials like steel and aluminum.
- Always check material-specific charts—steel demands slower speeds, aluminum is faster.
Depth of Cut Guidelines
- Axial (depth into the workpiece) cuts should be kept within 0.050 to 0.125 inches depending on your machine’s rigidity.
- Radial (width of cut) can be up to 50% of the cutter diameter but keep it conservative if your mill isn’t very rigid to avoid tool deflection.
- Overdoing these can lead to chatter or tool damage, so stay within your machine’s capabilities.
Troubleshooting Vibration and Surface Issues
- Chatter is your enemy. To cut it down:
- Lower your feed rate slightly or reduce depth of cut.
- Use tools with a larger diameter or higher number of inserts for smoother cutting.
- Make sure the workpiece is clamped tightly—any movement amplifies vibration.
- If the surface finish is rough, try reducing feed rate and increasing spindle speed for finer chip removal.
Local Tips for U.S. Shops
- Most U.S. users work in imperial units, so keep handy conversion tools or software ready when reviewing specs in metric.
- Affordable coolant options like water-soluble oils work well for face milling setups without investing in full flood systems.
- For hobbyists or smaller shops, tapping into local material supplier data sheets can save time dialing in feeds and speeds.
Following these simple guidelines helps keep your facing milling machine running smooth, extending tool life while hitting those tight surface finish targets.
Face Milling vs Other Operations When to Choose It
Face milling stands out when you need a flat, smooth surface across a broad area. Here’s a quick comparison to help you know when to pick face milling over other common milling operations:
| Operation | Coverage Area | Tool Rotation | Force Direction | Best For |
|---|---|---|---|---|
| Face Milling | Large flat surfaces | Cutter axis perpendicular to surface | Axial, pushes down | Smooth flat surfaces, finishing |
| Peripheral Side Milling | Narrow edges, slots | Cutter axis parallel to surface | Radial, pushes sideways | Cutting edges, slots, grooves |
Face Milling vs Lathe Facing
While lathe facing spins the workpiece and cuts along the axis to flatten the end, face milling keeps the workpiece still and rotates the cutter perpendicular to the surface. This makes face milling better for larger, thicker parts and multi-surface machining.
Hybrid Workflows
It’s common to use face milling first to prep a flat surface before drilling or contouring. The flatness and finish help improve accuracy in follow-up operations and reduce tool wear.
How Face Milling Fits in Multi-Step Jobs
- Prepping surfaces: Use face milling early to create smooth, flat surfaces.
- Setting reference points: Flat faces help with aligning parts for drilling or other machining.
- Improving finish: Finish face milling passes can get your parts ready for assembly or coating without extra steps.
So, for U.S. shops looking to balance speed, finish, and accuracy, face milling is often the go-to first step before drilling or contouring, especially when working on aluminum, steel, and other common materials.
Safety Maintenance and Common Mistakes to Avoid
When working with a facing milling machine, safety should always come first. Here’s what you need to keep in mind:
- Wear proper PPE: Always use safety glasses, gloves, and hearing protection. Chips fly off fast, and eye or hand injuries are common without protection.
- Keep chip evacuation clear: Make sure your work area and machine stays clear of metal chips. They can cause slips or get caught up in moving parts.
- Guarding: Use machine guards whenever possible to prevent accidental contact with spinning cutters or moving parts. This is especially important in manual feed setups where your hands are near the cutter.
- Avoid entanglement risks: Don’t wear loose clothing, jewelry, or long hair that can get caught in the spindle or cutting tools.
For machine maintenance, keeping your machine in good shape extends tool life and improves safety:
- Inspect tools and inserts regularly for wear or damage.
- Check spindle alignment often to avoid uneven cuts or vibrations.
- Lubricate moving parts and clean coolant systems to prevent buildup that can cause overheating or failure.
Watch out for these common mistakes that can cause problems or damage:
- Over clamping the workpiece can distort parts and cause inaccurate milling.
- Using improper entry angles on the cutter leads to premature wear and poor surface finishes.
- Not properly securing the workpiece can cause chatter or even dangerous ejection during cutting.
Many users share real fixes on forums, like adjusting feed rates or using specific clamping setups to reduce distortion and improve finish. It’s always worth learning from these shared tips to avoid downtime and get safer, better results.
Real World Applications and Case Studies
Face milling machines play a big role across industries. In aerospace, they’re used to finish turbine faces where flat, precise surfaces matter a lot. Automotive shops rely on them for machining engine blocks, creating smooth surfaces quickly to meet tight tolerances. Prototyping shops benefit too, since face milling speeds up the process of prepping parts for the next steps like drilling or contouring.
Here’s a real example: A Midwest machine shop switched to Vast’s indexable face mills on their aluminum parts. The result? They slashed cycle times by 30%. The tools held up longer and cut smoother, helping them push more parts through with less downtime.
We’re also seeing new trends with high-speed face milling tied to Industry 4.0 setups. Shops that integrate smart controls and data analysis in their CNC face milling machines get better precision and efficiency, especially when handling complex jobs or mixed materials. This keeps U.S. manufacturers competitive by reducing waste and improving throughput.
In short, a facing milling machine is not just for basic flat surfaces anymore. It’s becoming an essential tool for fast, reliable, and versatile machining in modern manufacturing.