Learn how to measure the radius of a fillet with step-by-step guides using calipers, radius gauges, CAD tools, and 3D scanning for precision engineering.
Why Accurate Fillet Radius Measurement Matters in Engineering
Measuring the radius of a fillet precisely isn’t just a detail—it’s a must in engineering. Fillets smooth out sharp corners, reducing stress concentrations that can cause cracks or failure. If the radius is off, even by a small amount, it can impact the strength and durability of a part. Think about a machined corner radius that’s too small; it might create a weak point that breaks under pressure.
Accurate fillet radius measurement also ensures parts fit together perfectly, especially in assemblies where tight tolerances matter. In industries like aerospace, automotive, or medical devices, even minor inaccuracies can lead to major issues—delays, costly rework, or safety risks.
Plus, engineers rely on these measurements for quality control and reverse engineering curves during design updates. When you get the radius right, it means the whole system runs smoother, lasts longer, and performs better. In short, precision here helps you avoid headaches down the line.
Essential Tools and Preparation for Measuring Fillet Radius
To measure the radius of a fillet accurately, having the right tools and proper preparation is key. Here’s what you’ll need:
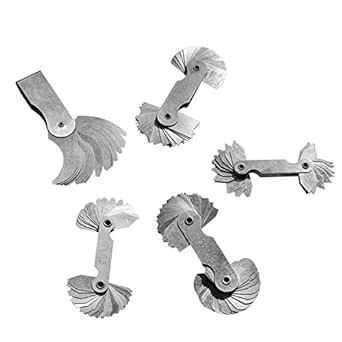
- Radius Gauge Set: These are curved templates that match common fillet sizes. Radius gauges are perfect for quick, manual checks on small fillets and come in both convex fillet gauge shapes.
- Fillet Measurement Calipers: Digital or dial calipers help measure dimensions around the fillet. Look for calipers with fine measurement resolution for better accuracy.
- Surface Cleaner: Clean the fillet surface to remove dirt, oil, or debris. A clean surface ensures the measuring tools sit flush and provide precise readings.
- Good Lighting and Stable Setup: Make sure your workspace is well-lit, and the part is held steady to avoid movement during measurement.
- Optional String or Flexible Curve: For low-tech methods, a small piece of string or a flexible curve can help estimate the fillet’s arc length.
Before measuring, inspect the fillet for any irregularities or damage that might affect accuracy. If you’re working with CAD or digital methods, prepare your 3D files or scans by cleaning up the model to highlight the fillet edges clearly.
Starting with the right tools and setup can make all the difference in getting reliable fillet radius measurements, especially when dealing with tight ISO fillet tolerance requirements or stress concentration concerns in machining corner radius.
Manual Methods Using Radius Gauges Most Popular for Small Fillets Caliper and Low-Tech Hacks String Arc Length Technique
When it comes to measuring the radius of a fillet manually, several reliable methods work great, especially in everyday shop or field situations. Here’s how you can do it:
Using Radius Gauges for Small Fillets
Radius gauge sets are the classic tool you want for small fillets. These gauges come with a variety of curved edges matching common radii. Just match the gauge’s curve to your fillet – if it fits snugly with no gaps, that’s your radius. It’s quick, simple, and works well for fillets usually under an inch. A convex fillet gauge can help you measure outward curves efficiently.
Measuring Fillet Radius with Calipers
You can use calipers to measure the fillet radius roughly, especially if you don’t have a radius gauge handy. Measure the fillet’s width (chord length) and the height (sagitta). Then apply the sagitta method radius formula:
Radius = ((Chord²) / (8 × Sagitta)) + (Sagitta / 2)
This method is handy if you want a quick estimate and don’t mind some approximation. Digital calipers make it easier to get accurate measurements for both chord and sagitta.
Low-Tech Hacks for Fillet Radius Measurement
If tools are limited, you can use things like flexible rulers or even a piece of string. Lay a string along the curved fillet, mark the length, then stretch it straight and measure that length. Compare it against a straight-line chord measurement to estimate radius. It’s not super precise but useful for rough checks during machining or machining corner radius validation.
String Arc Length Technique
This technique involves measuring the arc length along the fillet with a flexible string or tape, then using the chord length between the arc’s endpoints. Similar to the caliper method, once you have the arc and chord lengths, you can calculate the radius with basic geometry formulas. This is a helpful trick if you’re reverse engineering curves and want to avoid complex equipment.
Each of these manual methods is practical for different levels of accuracy and equipment availability. For precision work and consistent tolerances (like ISO fillet tolerance), you might consider pairing these with digital or CAD-based approaches for verification.
Digital and CAD Methods for Measuring Fillet Radius
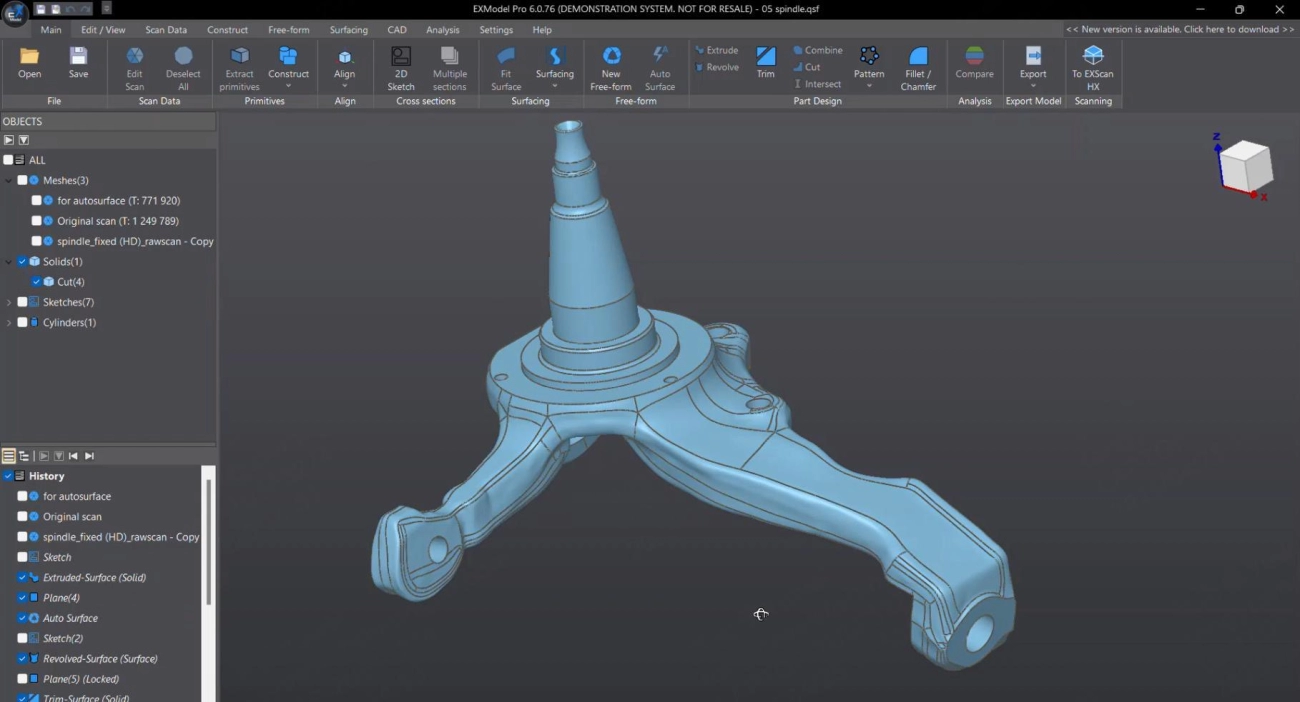
When manual tools aren’t enough, digital and CAD methods offer precise ways to measure the radius of a fillet. If you work with SolidWorks or Autodesk Fusion 360, these programs come with built-in CAD fillet radius tools that let you select the fillet edge and instantly get its radius value. This is especially handy when dealing with complex parts where manual measurement is tough.
For even higher accuracy, advanced 3D scanning systems like those from KEYENCE can capture the exact shape of a fillet. These 3D scans provide detailed data that helps check fillet radius accuracy against design specs, perfect for reverse engineering curves or verifying machining corner radius.
You can also use custom calculations based on geometry formulas, such as the sagitta method, which measures the arc height and chord length to calculate the radius. This approach works well when you only have access to certain dimensions and need a quick radius estimate.
Using digital and CAD methods ensures clear, reliable data for stress concentration fillet analysis or maintaining ISO fillet tolerance in manufacturing processes.
Troubleshooting Common Challenges and Best Practices
Measuring the radius of a fillet isn’t always straightforward. Here are some common issues you might run into and how to handle them:
Challenges
- Irregular fillet surfaces: Sometimes your fillet surface isn’t perfectly smooth, making gauge or caliper readings tricky.
- Tight or small fillets: Small radii can be hard to measure with regular tools like radius gauge sets or calipers.
- Complex geometry: Curves may not be simple arcs, especially on intricate parts, which can throw off manual measurements.
- Measurement errors: Human error, parallax, or tool calibration can affect accuracy.
Best Practices
- Use the right tool for the job: Use a radius gauge set for small, simple fillets. For larger or complex fillets, consider digital methods or 3D scanning for better accuracy.
- Repeat measurements: Take multiple readings from different angles or spots, then average them out.
- Check tool calibration: Ensure calipers and gauges are properly calibrated before use.
- Leverage CAD software: Tools like SolidWorks and Autodesk Fusion have built-in CAD fillet radius tools that can measure with exact precision if you have the 3D model.
- Apply the sagitta method: For rough measurements, use simple geometry formulas like the sagitta method to estimate fillet radius when tools can’t reach.
- Understand ISO fillet tolerance: Know the acceptable tolerance levels for your project to avoid over-precision that wastes time.
- Document your method: Keep clear notes on how you measured to maintain consistency over time, especially if you’re reverse engineering curves or ensuring stress concentration fillets meet specs.
By following these tips, you’ll reduce errors and get reliable fillet radius measurements that work well for machining corner radius checks or quality control.