Discover expert tips for designing and 3D printing strong screw threads with CAD guides inserts and troubleshooting for perfect fits every time.
Ever tried printing your own 3D printed screw threads only to end up with a frustrating fit that just won’t screw in smoothly? You’re not alone. Creating reliable, functional threads in 3D prints—especially with FDM or SLA printers—can be a real challenge, from tiny tolerances to material quirks. But here’s the good news: with the right design tweaks, printing settings, and clever post-processing hacks, you can turn weak, binding threads into strong, repeatable fits that actually work. Ready to ditch the trial-and-error? Let’s dive into how you can master 3D printed screw threads for your next project and get flawless results every time.
Why 3D Printed Screw Threads Are Tricky and Why They’re Worth It
If you’ve ever tried 3D printing screw threads, you know it’s not as simple as it looks. The challenges come down to a few core issues: layer resolution limits, material shrinkage, and how print orientation impacts strength. Since 3D printers build objects layer by layer, the fine details needed for clean threads can get lost or rough around the edges. Plus, plastics tend to shrink a bit as they cool, messing with thread fit. Orientation matters too—printing threads vertically often gives stronger engagement compared to horizontal prints, where layers can separate under torque.
Despite these hurdles, 3D printed screw threads are totally worth the effort. They save money and time, especially for prototypes where custom sizes or quick iterations beat ordering metal hardware. You can design threads integrated directly into your print, eliminating extra parts and simplifying assembly.
Testing shows that printed M5 threads with 50% infill can hold between 20 and 50 kilograms of pull force. That’s plenty strong for many projects in the maker community. It’s no wonder searches for “3D printed screw threads” have spiked among hobbyists and small-scale engineers looking to push the limits of their FDM and SLA printers.
If you’re part of the vibrant maker scene, mastering 3D printed threads opens up a whole new level of customization and innovation in your projects.
Essential Design Principles for Print-Ready Screw Threads
When designing 3D printed screw threads, choosing the right thread type and size is key. In the U.S., both metric and imperial threads are used, but for FDM printing, I recommend sticking with metric sizes—especially M6 or larger. Smaller threads like M3 or M4 can be tricky due to printer resolution limits and material shrinkage, which might cause weak or incomplete threads.
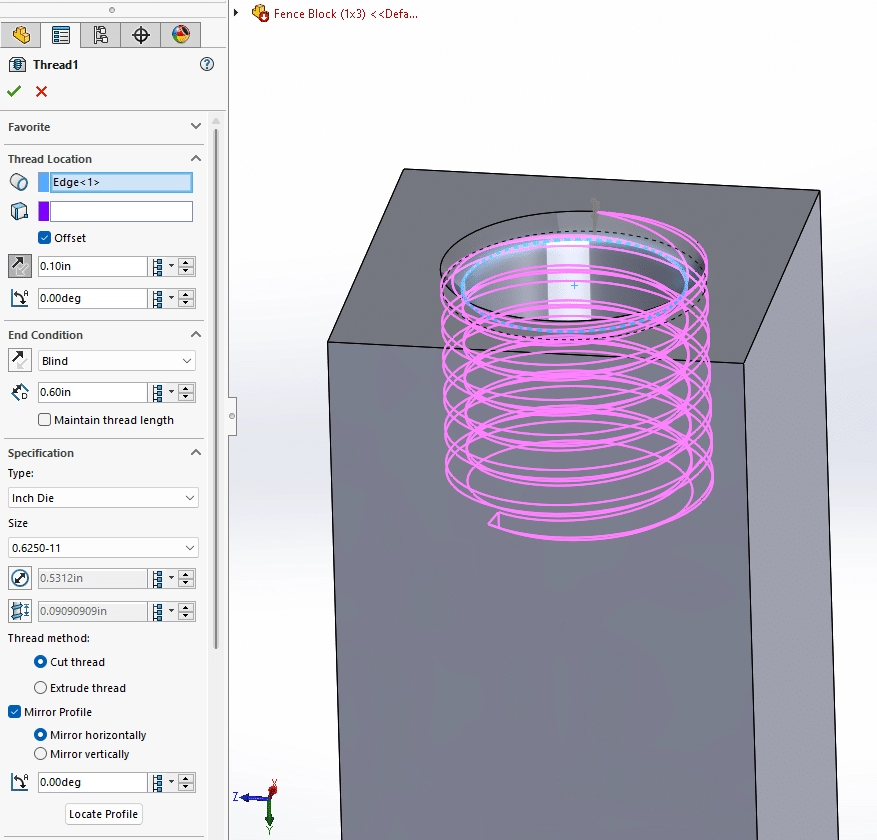
For CAD modeling, the best practice is to design with clear offsets and rounded profiles. Use semi-circular thread profiles rather than sharp triangles, and add fillets to smooth edges. This helps your printer create cleaner layers and reduces failure points. If you’re using Fusion 360 or similar software, consider downloading STL thread templates to speed up your workflow and keep thread accuracy consistent.
Printing orientation also makes a big difference. For external threads, print them vertically whenever possible. This minimizes overhangs and reduces the need for supports, which can mess with the thread quality. If you must print in a different orientation, use slicer settings to optimize bridging and support only the necessary areas, keeping threads clear and strong.
By following these design and orientation tips, you’ll improve your chances of printing functional, durable 3D printed screw threads without costly trial and error.
Step-by-Step Guide to Printing Functional Threads
Printer and Material Setup
When it comes to printing functional 3d printed screw threads, your choice between FDM and SLA matters. FDM printers are common and affordable, but SLA gives you higher detail, great for tight thread profiles. For materials, nylon and PLA are popular. Nylon offers better durability and some flexibility, making threaded parts less prone to cracking. PLA is easier to print but can be brittle and less durable for load-bearing threads.
Layer height around 0.1 to 0.2 mm works best—fine enough for clear thread edges but not so slow it kills your print time. Infill around 50% balances strength with material use.
Slicer Settings for Success
Setting your slicer right is key to avoid thread issues:
- Use a smaller nozzle (0.4 mm or less) for better detail.
- Print slower, about 30-40 mm/s, to nail thread accuracy.
- Add a brim or raft to keep your part stable and prevent warping.
- Watch out for binding during printing—try the “chase method,” where you pause and move the nozzle gently around the thread areas to clear any filament hang-ups.
Direct Printing vs Post-Processing
You can print threads directly as semi-helical profiles, which lets you skip extra hardware. This works well if you print test screws into slightly smaller holes to gauge fit before the final print.
If your threads need more strength or a perfect fit, post-processing helps:
- Tap the threads manually after printing.
- Use self-tapping screws for flexible hold in PLA or nylon.
Pro Tips for Filament Choices and Visual Aids
- Nylon is your go-to for strong threads but watch moisture—dry your filament before printing.
- PLA works for prototypes or low-stress parts.
- PETG balances strength and ease of use if you want something in between.
- Use color-coded thread models or add visual thread markers in your CAD files to check print accuracy on the fly.
With these steps, printing functional 3d printed screw threads gets simpler and more reliable—making your parts ready for real-world use.
Top Methods to Add or Enhance Threads in 3D Prints
When you want stronger, more reliable screw threads in your 3D prints, adding hardware inserts or using tapping methods can make a big difference. Here’s a quick rundown of the best options for U.S. makers and engineers working with 3D printed screw threads.
Heat-Set and Screw-to-Expand Inserts
Heat-set inserts are popular for adding durable, metal threads into plastic parts. You basically heat the insert with a soldering iron and press it into a pre-made hole in your print. They bond well with materials like PLA or nylon and provide strong, reusable threads.
- Pros: Solid grip, high pull force, reusable threads
- Cons: Requires precise hole sizes, extra tools (soldering iron)
- Installation Tips: Drill or print the hole slightly undersized, heat the insert evenly, and press in slowly to avoid warping.
Screw-to-expand inserts expand when a screw is driven in, gripping the walls tightly. They’re easier to install without heat but usually best in tougher filaments like nylon.
- Pros: No heat needed, good for certain plastics
- Cons: Less common, may require pilot holes and careful sizing
Tapping and Self-Tapping Screws
Tapping involves printing a hole slightly smaller than the screw thread and then cutting threads into it using a tap. This works well with durable filaments and creates strong, custom threads inside your print.
- When to Tap: For medium to high load applications or when you want reusable threads.
- Tips: Always prepare a clean pilot hole, and choose taps that match your screw size.
Self-tapping screws cut their own threads when driven into softer plastics like PLA. This saves time but is only okay for low-load situations.
- When to Skip: Avoid for high-stress parts or parts that will be frequently assembled and disassembled.
Nuts and Embedded Hardware
Embedding nuts during printing or gluing them post-print adds another level of thread strength. Common methods include fitting hex nuts into cavities designed in the model or using glue to secure them afterward.
- Glue-in Nuts: Provide good pull strength but aren’t ideal for high torque.
- Embedded Nuts: Usually stronger and more stable during use.
Thread Strength and Pull Force Comparison Table
| Method | Strength | Cost | Ease of Use | Best Use Case |
|---|---|---|---|---|
| Heat-Set Inserts | High (50+ kg pull) | Moderate | Moderate (tools) | Durable threads, repeated use |
| Screw-to-Expand Inserts | Medium-High | Moderate-High | Easy | Nylon parts, soft plastics |
| Tapping (Cut Threads) | High | Low | Moderate | Custom threads, medium load |
| Self-Tapping Screws | Low-Medium | Low | Easy | Quick low-load fixes |
| Embedded Nuts | High | Low-Moderate | Moderate | High torque, threaded inserts |
Ready to Upgrade Your 3D Printed Threads?
If you’re looking to boost thread strength or experiment with custom hardware, consider trying heat-set inserts or tapping for most reliable results. For quick fixes, self-tapping screws or glued nuts can work well. Local U.S. maker communities often share STL models designed for inserts and threaded hardware—check those out for custom projects.
Need custom inserts or help picking the right hardware? Many U.S. suppliers now offer kits tailored for 3D printed projects. Getting the right thread solution can save time, improve part life, and keep your builds tight.
Testing and Troubleshooting Ensure Your Threads Last
Making sure your 3d printed screw threads hold up means paying attention to testing and fixing common issues early on.
Strength Testing Basics
- Pull tests: Check how much force your printed threads can hold. M5 threads with 50% infill usually handle 20-50kg pull force.
- Torque checks: Twist printed screws gently to see if threads strip or hold firm. This matters if your part needs to tighten or loosen repeatedly.
- Infill and cycle effects: Higher infill boosts strength, and repeated screwing cycles can wear down threads over time, so test both.
Common Fixes for Binding or Failure
- Lubrication: Using a bit of wax or silicone spray reduces friction and helps screws turn smoothly.
- Re-tapping threads: If threads bind, running a tap tool through can clean and straighten them.
- Scaling adjustments: Slightly enlarging or shrinking thread dimensions in your CAD model can fix fit problems caused by printer inaccuracies.
- Metal hybrids: Adding metal inserts or screws can strengthen high-stress connections and prevent plastic threads from failing.
Local User Tips
- Many US makers notice humidity and temperature changes affect print quality—keep your printer area climate-controlled when possible.
- Warp prevention is key on larger prints with threads; using a heated bed and good adhesion helps keep threads precise.
- Beta services and local maker groups offer testing support and share fixes for common thread troubles—great resources if you’re struggling.
With these checks and tweaks, your 3d printed screw threads will last longer and perform better every time.
Advanced Tips and Real-World Applications
When it comes to pushing the limits with 3d printed screw threads, think beyond just small parts. Scaling threads up to fit pipes or tubes is a smart move for custom plumbing or robotics projects. These larger threads need careful tuning—like adjusting thread pitch and wall thickness—to keep strength without overusing material.
In robotics and custom tool making, integrated 3d printed threads let you build complex assemblies without extra hardware. Bundling different filaments, such as flexible combined with rigid materials, opens up new possibilities. For example, combining nylon’s durability with TPU’s flexibility can create hybrid parts that hold threads under stress while reducing brittleness.
Looking ahead, multi-material printing is the future for hybrid strength. This tech lets you print threads in tough materials, like carbon-fiber filled filaments, directly onto more flexible bases. That means stronger, lighter parts and fewer finishing steps. If you’re in the US maker scene, staying on top of these trends helps you make reliable, cost-effective threaded components tailored for everything from household fixes to industrial prototypes.