Learn the polishing process with step-by-step guides on techniques, tools, and tips to achieve flawless mirror finishes on metals and more.
Ever stared at a dull metal piece and wondered how pros get that flawless, mirror-like finish? The polishing process is what transforms rough, scratched surfaces into smooth, shining works of art—and it’s not as complicated as you might think. Whether you’re polishing jewelry at home or refining parts in a small workshop, understanding the right steps, tools, and techniques can make all the difference. In this guide, you’ll discover how to master the polishing process to achieve stunning, durable finishes every time—no guesswork, just proven methods. Ready to unlock your project’s true shine? Let’s dive in.
Understanding the Fundamentals of the Polishing Process
Polishing is all about refining a surface by carefully removing material through friction. This process uses progressively finer abrasives—called grits—to gradually smooth out imperfections. Starting with coarser grits removes rough spots, while finer grits create a sleek, mirror-like finish. It’s a bit like sanding wood, but much more precise.
A key idea in polishing is how light interacts with the surface. Polished surfaces achieve specular reflection, meaning light bounces off evenly, giving that shiny, mirror-like look. In contrast, unpolished or rough surfaces scatter light in many directions, known as diffuse reflection, which makes them look dull. Proper surface preparation is essential to achieve this smooth reflection by eliminating scratches and irregularities.
There’s often confusion between polishing, grinding, and buffing. While all involve surface smoothing, grinding uses heavier abrasives to shape or remove significant material quickly, often leaving a rough finish. Buffing typically focuses on enhancing shine using soft wheels and compounds, usually after polishing has done the heavy work. Polishing sits in between, offering controlled material removal for a refined, defect-free surface.
By mastering these fundamentals, you set the stage for a successful polishing process, creating surfaces that not only look better but also perform better in their intended applications.
Types of Polishing Processes Choosing the Right Method for Your Needs
When it comes to polishing, choosing the right process depends on your material, budget, and desired finish. Here’s a quick look at the main types:
Mechanical Polishing Methods
- Hand Polishing: Great for small jobs and detailed work. Offers good control but takes more time and effort.
- Machine Polishing: Ideal for larger surfaces or high-volume work. Faster and more consistent, but requires equipment investment.
Both use abrasive polishing compounds to remove surface imperfections and create a smooth finish.
Chemical and Electropolishing Techniques
- Chemical Polishing: Uses chemical solutions to smooth surfaces by dissolving small amounts of material. Good for complex shapes but can be slow and involve hazardous chemicals.
- Electropolishing: An electrochemical process that removes microscopic layers for a bright, corrosion-resistant finish. Often used in medical devices and aerospace parts but requires precise control and equipment.
Other Polishing Variants
- Vibratory Polishing (Tumbling): Uses vibration and abrasive media to polish multiple small parts simultaneously. Efficient for batch processing but limited to smaller items.
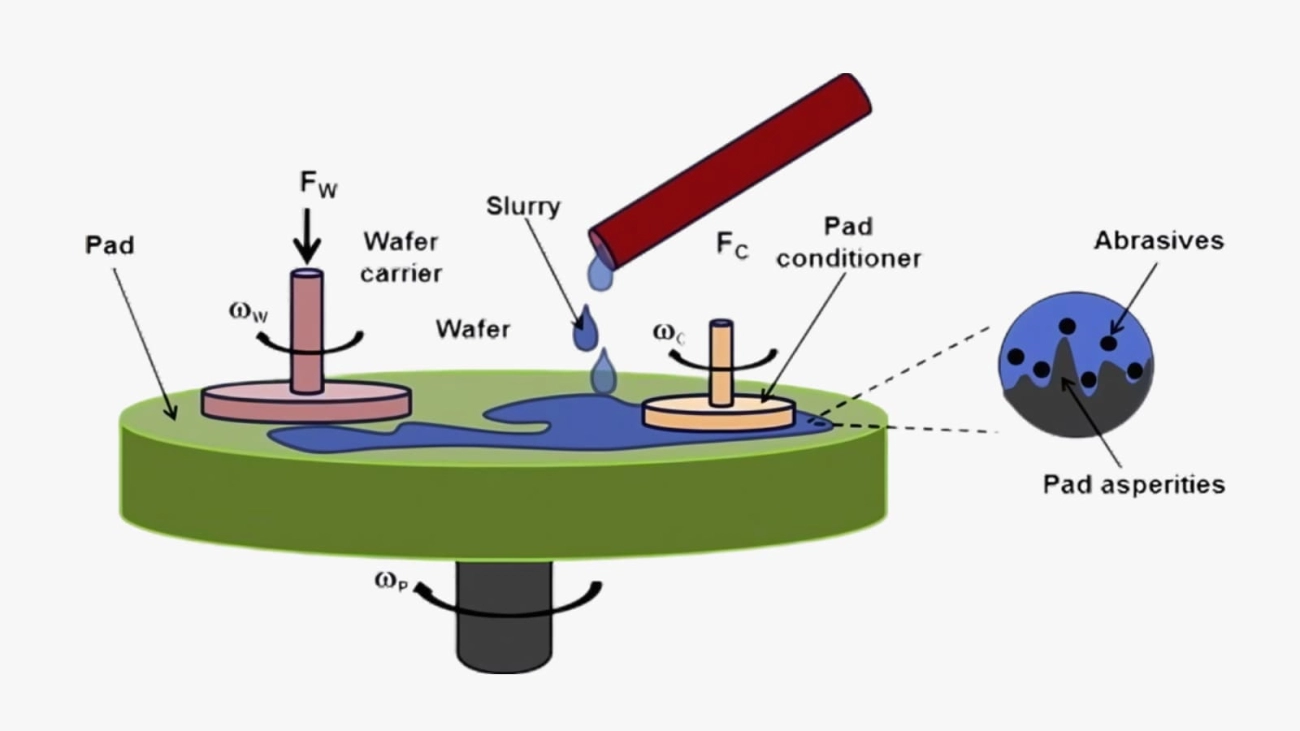
- Chemical Mechanical Planarization (CMP): Common in electronics manufacturing to achieve ultra-smooth surfaces on wafers.
- Hybrid Approaches: Combining methods like mechanical grinding followed by electropolishing to balance productivity and quality.
Decision Framework
When picking a polishing process, consider:
- Material Type: Metals, plastics, glass, and ceramics respond differently to each method.
- Size and Scale: Large parts often need machine or chemical polishing, while small items might be better off hand-polished or vibratory polished.
- Cost and Time: Hand polishing is labor-intensive but low-cost in equipment, while chemical and electropolishing require specialized gear and safety measures.
Balancing these factors will help you pick a polishing process that fits your project and budget perfectly. For custom polishing needs, especially large or specialized orders, working with a factory experienced in polishing process customization—whether domestic or involving China-based manufacturing—can be a smart move.
Step-by-Step Guide to the Polishing Process

Preparation Surface Assessment Cleaning and Abrasive Selection
Start by checking the surface you want to polish. Look for scratches, rust, or dirt that could affect the finish. Clean the surface thoroughly using suitable cleaners to remove oils and debris. Next, pick the right abrasive polishing compounds based on your material—coarser grits are for heavy smoothing, finer grits for detail work. Proper surface prep is key for a smooth, defect-free finish.
Execution from Coarse Foundation to Fine Mirror Finish
Begin polishing with a coarse grit to remove major imperfections and shape the surface. Once the rough work is done, switch to an intermediate grit to smooth out scratches left by the coarse. Finally, use fine abrasive compounds to achieve that mirror finish many expect from quality polishing. Take your time through each stage; rushing can cause uneven surfaces or overheating.
Finishing Rinsing Inspection and Protectant Application
After the polishing stages, rinse the item with water or a suitable solvent to remove any leftover abrasive particles. Carefully inspect the surface under good light for defects such as holograms or staining. If everything looks good, apply a protectant or coating designed to maintain the surface’s shine and improve corrosion resistance. This step extends the life and durability of your finish.
Tools and Safety Essentials Tips for Heat Control and PPE
Use the right tools, whether you’re hand polishing or using machines like vibratory polishers or buffing wheels. Be sure to wear proper personal protective equipment (PPE) such as gloves, goggles, and masks to protect against dust and particles. Control heat buildup by polishing in short bursts and letting the surface cool—this prevents damage and discoloration.
Troubleshooting Defects like Holograms and Staining
If you notice holograms (rainbow-like patterns) or staining, it usually means the surface wasn’t polished evenly or was overheated. Fix this by returning to a slightly coarser grit and polishing again more carefully. Avoid skipping grit levels or using too much pressure, which often causes these defects. Proper technique and patience are your best defense against polishing issues.
Benefits and Real-World Applications of the Polishing Process
Polishing goes beyond just making surfaces shiny. It plays a big role in improving durability by smoothing out tiny surface flaws that can lead to wear and tear. This makes items last longer and perform better. Polished surfaces are also easier to clean, which enhances hygiene—something critical in medical tools, food processing, and consumer goods. Plus, a well-polished finish reduces friction, which helps machines run smoother and cuts down on energy waste.
Different industries rely on polishing in unique ways. In jewelry, the polishing process creates that signature mirror finish that catches the eye and adds value. Aerospace parts benefit from polishing by improving aerodynamic efficiency and preventing corrosion. Consumer goods made in U.S. factories often use polishing to enhance both look and feel, making products more appealing and reliable for American customers.
Measuring the impact, polishing can significantly extend the lifespan of parts by reducing friction and preventing rust or buildup. This is a big win for maintenance costs and product quality, especially in high-wear environments. Using polishing processes tailored to your material and needs ensures you get the best long-term results without overdoing it.
Advanced Tips Common Mistakes and Maintenance for Long-Lasting Results
To get the most from your polishing process, here are some advanced tips and common pitfalls to watch out for.
Pro tips for better polishing
- Use progressive grit jumping carefully. Don’t skip too many grit levels at once; it can cause surface damage instead of smoothing.
- Consider automation where possible. Machines can keep pressure and speed consistent, improving quality and saving time.
- Keep your abrasives clean and replace them regularly to avoid contamination and uneven polishing.
Common mistakes to avoid
- Over-polishing can wear away critical details and even cause heat buildup that damages the material.
- Applying inconsistent pressure leads to uneven finishes and can create defects like holograms or swirl marks.
- Rushing the stages skips vital surface preparation, impacting the final mirror finish.
Post-polish care and maintenance
- Apply protective coatings to preserve the polished surface and reduce corrosion risks, especially for metals.
- Perform routine inspections to catch early signs of wear, staining, or surface degradation.
- Clean surfaces properly after polishing to remove any residues that could affect appearance or performance.
Following these simple strategies will keep your polished parts looking great and performing well longer, which is essential whether you’re working with custom jobs from a polishing process factory in China or handling everyday polishing tasks locally.