Learn how to tap thread like a pro with easy step-by-step guides using Vast tools for metal wood DIY projects and repairs.
Understanding Tap Threads The Basics You Need to Know
Before diving into tapping threads, it helps to understand what a tap thread is and why it’s so important in DIY projects and repair work. A tap thread refers to the internal groove cut inside a hole that allows bolts or screws to grip securely. Think of it as crafting a custom path inside your material so fasteners hold tight without slipping.
What Is a Tap Thread and Why Use It
Tap threads create those internal screw grooves you find inside nuts or screwed holes. We use them whenever a strong, reusable threaded connection is needed—whether to join metal parts, build furniture, or fix machinery. Without proper tap threads, screws won’t hold, causing weak joints and potential safety issues.
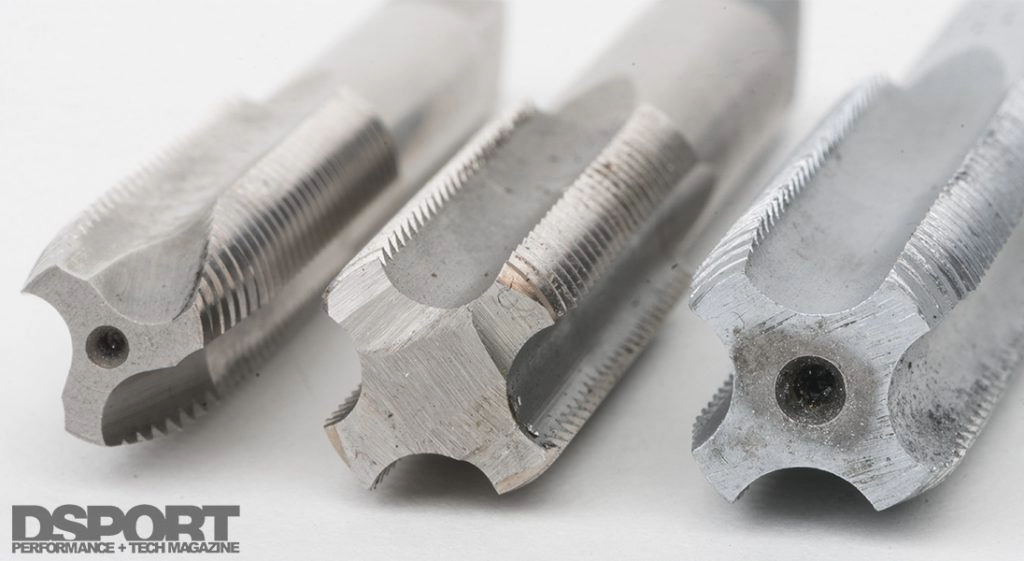
Tap Types Explained Taper Plug and Bottoming Taps
There are three common types of taps, each designed for a different part of the threading process:
- Taper Tap: Starts threading gently with a tapered end; great for beginners to start the cut easily.
- Plug Tap: Cuts threads deeper than taper taps, suitable for holes that are partially threaded.
- Bottoming Tap: Cuts threads all the way to the bottom of a blind hole; perfect for tight spaces where you need full thread depth.
Knowing when to use each type helps you get clean threads without damaging your workpiece.
Thread Standards Metric vs UNC UNF
Threads come in different standards depending on your project’s requirements:
| Standard | Description | Common Use |
|---|---|---|
| Metric | Measured in millimeters | Most global applications, especially automotive and machinery |
| UNC | Unified National Coarse | Quick assembly, common in construction and general use |
| UNF | Unified National Fine | Stronger thread grip, used in precision parts and automotive |
Matching tap threads to the right standard ensures compatibility with bolts and nuts on hand.
Materials Matter Tapping in Metal Wood and Plastic
Your choice of material affects tap selection and technique:
- Metal: Requires lubrication and steady pressure to avoid tap breakage. Use oil or cutting fluid.
- Wood: Threads are softer and easier to cut but watch out for splitting. Go slow and don’t overtighten.
- cURL Too many subrequests.: Fragile and prone to cracking; use light pressure and consider special taps designed for plastics.
Each material needs a slightly different touch for perfect, durable threads. With the right info, tapping threads becomes a manageable and even enjoyable skill for your next project.
Essential Tools and Materials for Successful Thread Tapping

To tap threads accurately, you need the right tools and materials. Here’s what you should have on hand for the best results.
Must-Have Tools from Vast
- Hand Tap Set: Includes taper, plug, and bottoming taps to handle different threading tasks.
- Tap Wrench: A sturdy wrench that holds the tap securely and gives you control during tapping.
- Drill Bits: Correct drill size for taps is crucial. Use the recommended size based on your thread standard (Metric or UNC/UNF).
- Lubricant: Essential for smooth cutting and to extend the life of your taps. Choose cutting oil for metal or specialized tap lubricant.
- cURL Too many subrequests.cURL Too many subrequests.
cURL Too many subrequests.
- Safety GlassescURL Too many subrequests.
- cURL Too many subrequests.cURL Too many subrequests.
- cURL Too many subrequests.cURL Too many subrequests.
- cURL Too many subrequests.cURL Too many subrequests.
cURL Too many subrequests.
cURL Too many subrequests.
cURL Too many subrequests.
cURL Too many subrequests.

cURL Too many subrequests.
cURL Too many subrequests.
cURL Too many subrequests.
cURL Too many subrequests.
cURL Too many subrequests.
cURL Too many subrequests.
Step 4 Progress Through the Thread
As you tap, turn forward a full turn, then back up about a half turn to clear out chips. Keep the tap lubricated and maintain steady pressure to avoid cross-threading or breaking the tap. Work slowly especially when using bottoming taps which cut threads to the bottom of blind holes.
Step 5 Test and Finish
Once you’ve tapped the full depth, remove the tap carefully. Test the thread fit with the bolt or screw to make sure it’s smooth and secure. Clean out any leftover chips or debris from the hole to ensure proper assembly.
Pro Tip Avoiding Common Mistakes
- Always check you’re using the right drill size for the tap thread.
- Keep your tap straight to avoid crooked or damaged threads.
- Use proper lubrication every time to prevent tap breakage.
- Don’t force the tap; if it feels stuck, back it out and clean the hole before continuing.
- For blind holes, stop before the bottom and use a bottoming tap to finish clean threads.
Following these straightforward steps will help you nail the tap thread every time, whether you’re working on metal, wood, or plastic.
Advanced Thread Tapping Techniques for DIY Pros

Once you’ve got the basics down, stepping up your thread tapping game can save you time and improve results. Here are some advanced tips for getting the job done right.
Blind Hole Tapping Getting Threads to the Bottom
Tapping a blind hole means cutting threads without going all the way through the material. To do this cleanly:
- Use a bottoming tap, which is designed to cut threads close to the bottom.
- Tap slowly and back off frequently to clear chips and avoid jamming.
- Apply steady pressure, but don’t force it—you want smooth cutting.
- Keep the hole properly lubricated to reduce heat and wear.
This technique helps make full-use threads in places where through-holes aren’t possible.
Repairing Damaged Threads
Stripped or damaged threads happen, but you don’t always need to replace the whole part. Here’s how to fix them:
- Use a thread repair kit or a slightly larger tap to clean out and reshape the thread.
- For minor damage, a thread file can restore thread shape manually.
- Consider using inserts like Heli-Coils for stronger repairs, especially in softer metals or worn holes.
- Lubricate and tap carefully to avoid worsening the damage.
Repairing threads can save you money and time, especially on expensive or hard-to-replace parts.
Scaling Up Power Tapping with Drills
For larger projects or tougher materials, hand tapping can be slow and tiring. Power tapping with a drill or tapping machine helps:
- Use a drill with variable speed control to avoid spinning too fast.
- Employ a tapping attachment or guide to keep the tap aligned.
- Always start slowly and back off regularly to clear chips and reduce tap breakage risk.
- cURL Too many subrequests. cURL Too many subrequests. cURL Too many subrequests.
cURL Too many subrequests.
cURL Too many subrequests.
cURL Too many subrequests.
cURL Too many subrequests.
cURL Too many subrequests.
- cURL Too many subrequests.cURL Too many subrequests.
- cURL Too many subrequests.:
- cURL Too many subrequests.
- cURL Too many subrequests.
- cURL Too many subrequests.
- cURL Too many subrequests.
- cURL Too many subrequests.
cURL Too many subrequests.
- cURL Too many subrequests.cURL Too many subrequests.
- cURL Too many subrequests.:
- cURL Too many subrequests.
- Avoid excessive force during tapping.
- Double-check drill sizes before tapping to ensure a tight fit.
- Consider using a slightly larger tap to re-cut threads with care.
When to Call a Pro
- If a tap is stuck or broken deep inside a hole and you don’t have the right extraction tools.
- When the threads are severely damaged beyond simple repair kits.
- If you frequently experience tap breakage despite following proper steps, a pro can assess tool quality or technique.
By following these basic fixes and knowing when to reach out for help, you’ll save time, money, and keep your tapping projects on track.
Maintenance and Storage for Your Vast Tap Thread Tools
Cleaning After Use
Keeping your tap thread tools clean is key to making them last. After every job, wipe down your taps and dies to remove metal shavings and debris. Use a small brush or compressed air to clean the threads without damaging them. If you’ve been working with oily or sticky lubricants, clean the tools with a mild solvent or soapy water, then dry them completely to avoid rust.
Organizing Your Kit
A well-organized kit saves time and protects your tap thread tools. Store taps in their original cases or a dedicated organizer to keep them from knocking together and dulling. Keep your hand tap set and power tapping tools separated by size and type, with labels for quick identification. Use small containers or magnetic trays for loose parts like screws and washers. Proper storage keeps your tools ready to go and extends their life, making every thread tapping job smoother.